Friday, 4 February 2022

Let's Make A Scene!!


Hello lovelies.

I've been playing with the Distress Inks again and this time I used them alongside some stamps sets from Creative Expressions.


The stamp sets I used are  


and here's the finished card ...


I wanted it to look like a sunrise (or sunset) and I quite like that you could use this for lots of occasions.

I've done a video which shows you in real time how I used the inks and what stuff I used and you can see it here - 

https://youtu.be/d5HUXVVaQKU

I hope you find it useful if this is something you  fancy having a go at and I've also gone through the products etc on it as well.


Here's a few more pics


I just love that sentiment!! 


So that's me done for today. 
Take care and have a fabulous weekend. 

Hugs, Dawny xx


Thursday, 3 February 2022

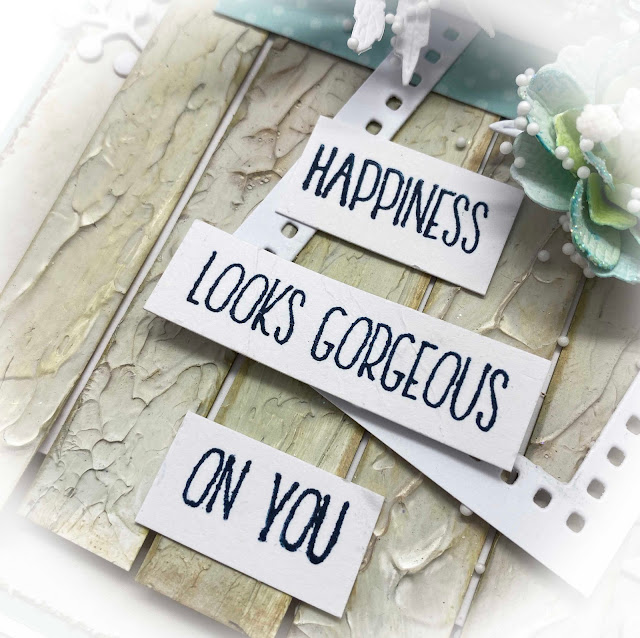
Shabby Chic Happiness :)


Hello lovelies and hope you are OK today.

There's a lot going on with this card today but I'll try and keep it as simple as I can.

I  will do a video for this because it's much easier to do than I can explain in words.


So ...


... this is the finished card. 

I've concentrated on making the faux wood here but I'll do the video this week to show you in detail how the card fits together.

 I've left a shopping list for you at the end for the stuff I used but if you haven't got all the bits and bobs, just have a mooch in your stash because you can always swap what I've used for something you have.

It's shabby chic so it doesn't have to be absolutely perfect.


Doesn't this faux wood look fab?

So to make it, take a sheet of watercolour card and using a palette knife or whatever you have to hand and spread the texture paste over the card.  (watercolour card works best because of the water content in the products used). You're aiming for uneven layers so vary how thick you apply it. 

Once you've done that, take your palette knife or something with a straight edge - thick cardstock would do - and make lines in the paste with the side of the knife. Also dab the paste to create little peaks - you want this to look as textured as you can get it. Once you're happy, leave it to dry - I left mine overnight.

Once it's dry, depending on the texture paste you used, you might want to make it look a little less shiny so just give it a coat of white gesso if you need to and again leave to dry.

Once dry, cut into strips then use Walnut Stain and Peeled Paint inks or the colours of your choice to colour the surface. I used a blending brush for this but a smoothie would work.

Stick the strips down onto a bit of waster card smaller than the overall size of the strips to make it easier to add to the front of the card when we come to do that. 

If you want to make the ends lie a bit uneven feel free - it looks nice like this I think.

'


More French Marigold flowers - I am addicted to this die set at the mo. This time I added some stamens I found in my stash but you don't have to add them.  They look gorgeous with or without.


I used silicone glue to stick  the flowers, twine  and leaves down and once I'd completely finished, I sprinkled some of those little polystyrene balls over it - this sticks to any bits of the silicone glue that's bare. This is a great tip I got from Anna Marie - it's a fabulous cover up.


And there we have it. 

I'll post on here when I've done the video but I'll get it done asap.

I'll say goodbye and leave you with the shopping list.
Take care and stay safe,

Hugs, Dawny xx


Wednesday, 2 February 2022

Elegance, Dreams and Fairy Wishes


]Hello lovelies and hope you are OK.

Here's a card I made using some Lavinia Stamps goodies and some Distress Inks ...


... and this is it.

So for this one, I used the Elegance stencil to make a background with Weathered Wood DI - very lightly applied - then I second generation stamped the Magic Surrounds Us words randomly before finally going around the edge of the card  with Tumbled Glass DI. 

Then I stamped the branch, fairy charms and fairy Rue over the stencilling. A stamping platform such as  the Vaessen Creative Stamp Easy really helps line everything up perfectly.

Usually I would mount this straight onto a white card blank but I went off piste here and lightly stencilled the card base with the Weathered Wood DI as well.


Once it was all in place, I added the sentiment. 


I added a bit of fairy dust (clear glitter to you and me lol)  to Rue's wings and also along the charms and I really like how this gave it a very subtle twinkle.


So there you have it. 

A quite simple card which didn't take very long but looks like you spend ages on it.

I'll list what I used here and it's all linked to where you can buy it from which I hope will help  - 


Tuesday, 1 February 2022

A Bit More Stencilling


Hello lovelies.
I'm sharing a card today which again I made a while ago but I really like it.

I've been at the stencils again and I THINK the stencil I used is from Tonic Studios - this one is Fantasy Floral. I'm not sure if this is still available in the UK but I reckon any stencil would do for this card.


And this is what I did.

I've used inks in blues and greens over watercolour card, but any colours you have would be fine.

I gave this one a little twist though ....


... and I painted over the inks in certain areas with a bit of water and also with a Tonic Glitter Gloss Shimmer Pen. 

I really like how it added an almost gold tint over the green.

Then I spritzed it all with some water before layering onto some white card and then again onto a white card base.


That olive green ribbon is over sized and just how I like it. A lady once told me at a craft show I was working at that she didn't like my 'in your face' bows. But I do like them and think they make your cards look fabulous.

The big pearly thing on top of the bow is an old button I found - I just cut the shank off and hot glued it down.

I'm going to re-visit this card with some new stuff I've just bought so watch this space.

Take care and thanks for stopping by today.

Hugs, Dawny xx