Wednesday 1 November 2017

Merry Christmas–Ooooh Is It Too Early To Say That???

Good mooring my lovelies and by the time you are reading this, myself and my Nikkie should be on our merry way to the NEC for the Christmas Crafting show.

Anybody going?
Come and say hello if you are – I’ll be on the Crafty Devils stand with my Tonic goodies, including the amazing Kaleidoscope Box (my fave product of the year - I LOVE this)

So today I’m sharing another project I made with the Tonic Kit #2


And ….

… this is it.

You get a sample pot of Radiant Gold Gilding Flakes and a Nuvo Glue Pen to use with them.

So I splodged (technical term lol) some Nuvo Glue onto one of the Poinsettias in the kit and let it go tacky, then I literally just rubbed the gilding flakes in.

Ditto the holly leaves.


Very simple but quite effective I think.

I used the largest outside edge die to form the base card.
You’ll need to chop a little bit off of the bottom edge point so that it stands up but it creates a lovely shape I think.


So that’s my make for today and I promise I won’t leave it so long until next time.
<=>I have lots of samples from the shows to share so I better get them photographed and on here when I get back!!</br<=>

Until then, happy crafting and crafty hugs to all.

Dawny xx

Tuesday 31 October 2017

Kit 2–Faaaaabulous

Good morning lovelies – it’s been a while but I haven’t been slacking I promise!!

So what have I got to share today?
Well I’ve been having a play with the new Tonic Kit #2 and it is LUSH.
You know me and colour, well as soon as I opened the box I was hooked!! The reds and golds are beautiful so I thought I’d make a couple Christmas cards.

And this is the first one.

It’s such a simple card to put together and it’s got quite a contemporary twist with the 3 sentiments.
The only thing I added that wasn’t in the kit was the tartan ribbon.


I’m not sure you can see but I didn’t stick the sentiments all the way down – the right hand edges are left free.

The little holly leaves were cut from the smallest die and I coloured them with the pens that come with the set.


I love the different types of card that come in this kit – it’s so versatile because they all work well together.

You get …

1967e Traditional Christmas Layering Die Set

1967e Holly Season Stamp Set

9817e Speciality Papers - Red Berries

9828e Speciality Card - Golden Satin

9075e Weave Textured - Chilli Red

9442e Mirror Card - Gloss - Harvest Gold

9471e Mirror Card - Satin - Scarlet Organza

9500e Pearlescent Card - Majestic Gold

9944e Glitter Card - Ruby Ritz

1987e Handmade Flowers - Red Poinsettia

997n Mini Crystal Drop - Red Berry

995n Mini Crystal Drop - Woodland Green

313n Woodland Greens Alcohol Marker Pack (contains Bamboo Leaf, Pine Grove and Hunter Green pens)

988n Gilding Flakes Sample - Radiant Gold

204n Large Nuvo Glue Pen

114e Decoupage Scissors (Subscribers Only)

1977e Craft Kit Wallet

1978e A5 Ring Binder


That’s a LOT of kit for sure.

If you get a sec, stop by tomorrow and I’ll share the  second card I made, which involves a bit of gilding (oooerrr!!).

Till then, have a great day and happy crafting.

Hugs,

Dawny xx

Wednesday 15 March 2017

Old Meets New


DSCN1914un-copy_thumb2

Hello lovely crafty friends.

Today’s card is a mixture of old and new and this is just one of the many reasons I <3 using Tonic dies. They work together so well.

So …


DSCN1912w-copy_thumb3


… this is what I did.

I used the Tonic Studios - Dimensions - Window Box - Tangled Terrace set but rather than make a window box, I used the outside edge as a border die.

It’s such a pretty die and if you add a little drop of Tonic Studios Nuvo crystal drop collection - Gloss White, it looks like you’ve punched a hole along the scallops.

I really like how it looks : )

DSCN1913w-copy_thumb2

Look at that embossed detail on the border edges – that was just one pass and I didn’t even have to use the embossing mat.

So that’s the new and now for a walk down memory lane.

For the old I used Sew Pretty – Cherish The Moment Frame die set  - the largest outside edge – and I embossed it with the embossing folder from Tonic Studios - Idyllics Die & Emboss Set - Blossoms & Battens.

The sentiment is Tonic Studios Miniature Moments Die Thinking of You which I drop-shadowed using  Tonic Craft Perfect cardstock in white and Kraft

DSCN1911w-copy_thumb3

So that’s my card and I hope you like the mixture of old and new.

Thank you for stopping by today and crafty hugs to all xx

Thursday 9 March 2017

The Same But Different …


Hello my lovelies.

I’ve got 2 cards to share today, both made using the Tonic Pretty Piazza Window Box Die Set.

DSCN1906w copy_thumb[2]

DSCN1909w copy_thumb[2]

Both use the same smaller inside edge which I cut at the top and the bottom of a 6x6 card blank.

But for the centre bit - the blue bit - I used the larger outside edge for one and the smaller one for the other. I cut two of each and chopped them up and joined them together – the white strips hides the join!!

There’s a subtle difference between the cards.  I can't chose my fave as I like them both lol, and it just goes to show how VERSO-tile these dies really are : )

I also added one or two White Gloss  Nuvo Crystal Drops – so pretty.

I made these whilst I was demoing so I left the sentiments off, but you could scoot that bow along and add a sentiment on the white strip.

Happy crafting and hugs to all  xx

Tuesday 28 February 2017

Boxing Clever


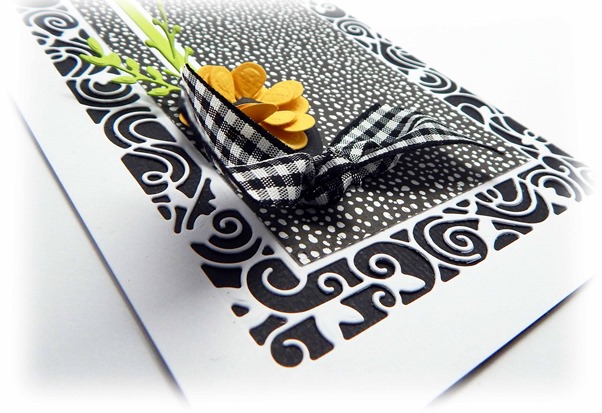
Hello my lovelies and here’s a card I’ve made using the brand spanking new Shadowbox Die Sets – this one uses the using the Family Three Insert Die and also the main Shadowbox Creation Set.


What do you think?

It’s got qute a contemporary feel to it and of course you can’t go wrong with black and white can you.


I used the inside egde from the Family Three set to cut the pattern into the card base and there’s a very handy die which cuts just the right size to fit your patterned paper etc into the centre of the pattern.


There are pieces included in the main Shadowbox Creation set which allow you to add extra detail.
I used one of the shorter edge pieces and threaded a strip of white card through it.

There are actually 38 different dies in the Creation set and I can see that I will use every one of them.
It is such a clever and useful set, not to mention versatile.


So that’s my card and I hope you like it.
Don’t forget to tune it on Friday for tons of inspiration.

Happy crafting xxx

Sunday 19 February 2017

Nifty & Thrifty : )

Hello crafty friends and I hope that you are all enjoying your weekend.


I thought I’d have a play with the Tonic Studios Octagon Laying Die Sets today and …

DSCN18901 copy_thumb[2]

… this is what I did.

It’s a very simple, quick and easy card to make – it’s also really versatile so you could use it for lots of occasions.
And it’s really light on your stash as well.

I used the fabulous ..

… Octagon Layering Set and you can get this from Crafty Devils  - you’ll find it right here .

If you haven't got these in your stash then I think you may be missing out on a real treat.

There’s so many things you can do with them and over the next few days I'll share a few more cards I made with them. Because there are little notches half way along each flat side of the dies, it makes lining up an absolute breeze.

Such a simple little thing but it’s so useful I think.


DSCN18911 (2)_thumb[2]

I do like black and white.

These scraps happened to be from the same pad – First Edition Black Out.
I had little more than corners really left over from other projects. 
But I’m sure any bits and bobs you’ve got tucked away would work as well.
It would even look nice in plain cardstock.


DSCN18891 copy copy_thumb[3]

The sentiment was done on the computer and I added some faux stitching with a fine liner pen.

I hope you like my card and thank you for stopping by today, and I’ll be back soon with another card made using this die set.

Enjoy the rest of your day and crafty hugs to all xx

Wednesday 15 February 2017

Getting a Bit Krafty :)


Ohh blimey, it’s been a while hasn’t it.
A lot has happened since I was last on here and I won’t bore you with any of it apart from moving house which has put the kibosh on my lovely old craft room.

I now have a teeny tiny one, cry muchly.

But enough of all that - let’s have a bit of krafty crafty shall we.

So my card today is for this month’s Win & Tonic February Challenge which is a Take Your Pick, and one of the options is to use Kraft. Well I didn’t have to think twice about this one because I LOVE the stuff.


So….

… this is what I did.

Now I have to apologise for the crappy pics here.
My old light box (cheap as chips from Maplins) seems to have gone awol during the move so I had to use the £70+ one off of the internet and I do not like it at all.


But you can see what I’ve done.

So I used one of my fave Tonic sets here and that is the Tonic English Picnic Large Layering Dies.
It is such a pretty set and I think it looks quite nifty with the Kraft.

I was thinking as I looked at these pics that when I come to do the insert, I will use the dies again on that.


The sentiment is made from one of the new alphabet die sets – this one is Essential Attraction Simple Type, Lower Case.
Aren’t these fab?
Especially when you have family with not so run of the mill names like I have.


A little bit of bloomage, leafage and a sparkler made from hot glue and some Nuvo Spiced Apricot glitter.

The bloom and leaf are made from Tonic Studios Beautiful Blooms - Sunburst Gazania


So that’s my card for today and I hope you like it.
I will be back a lot sooner than I was last time, for sure.

Take care and hope everybody is well.

Huggiest of hugs to all xxx