Showing posts with label shabby chic. Show all posts

Thursday, 3 February 2022

Shabby Chic Happiness :)


Hello lovelies and hope you are OK today.

There's a lot going on with this card today but I'll try and keep it as simple as I can.

I  will do a video for this because it's much easier to do than I can explain in words.


So ...


... this is the finished card. 

I've concentrated on making the faux wood here but I'll do the video this week to show you in detail how the card fits together.

 I've left a shopping list for you at the end for the stuff I used but if you haven't got all the bits and bobs, just have a mooch in your stash because you can always swap what I've used for something you have.

It's shabby chic so it doesn't have to be absolutely perfect.


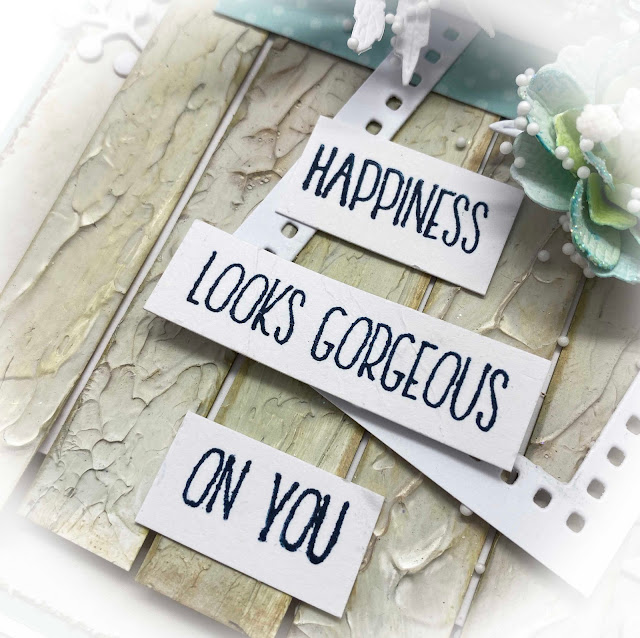
Doesn't this faux wood look fab?

So to make it, take a sheet of watercolour card and using a palette knife or whatever you have to hand and spread the texture paste over the card.  (watercolour card works best because of the water content in the products used). You're aiming for uneven layers so vary how thick you apply it. 

Once you've done that, take your palette knife or something with a straight edge - thick cardstock would do - and make lines in the paste with the side of the knife. Also dab the paste to create little peaks - you want this to look as textured as you can get it. Once you're happy, leave it to dry - I left mine overnight.

Once it's dry, depending on the texture paste you used, you might want to make it look a little less shiny so just give it a coat of white gesso if you need to and again leave to dry.

Once dry, cut into strips then use Walnut Stain and Peeled Paint inks or the colours of your choice to colour the surface. I used a blending brush for this but a smoothie would work.

Stick the strips down onto a bit of waster card smaller than the overall size of the strips to make it easier to add to the front of the card when we come to do that. 

If you want to make the ends lie a bit uneven feel free - it looks nice like this I think.

'


More French Marigold flowers - I am addicted to this die set at the mo. This time I added some stamens I found in my stash but you don't have to add them.  They look gorgeous with or without.


I used silicone glue to stick  the flowers, twine  and leaves down and once I'd completely finished, I sprinkled some of those little polystyrene balls over it - this sticks to any bits of the silicone glue that's bare. This is a great tip I got from Anna Marie - it's a fabulous cover up.


And there we have it. 

I'll post on here when I've done the video but I'll get it done asap.

I'll say goodbye and leave you with the shopping list.
Take care and stay safe,

Hugs, Dawny xx


Sunday, 13 July 2014

Thank You

Good morning sweet peeps and a very happy Sunday to you - I hope that you are all having a fab weekend : )

It’s time for another ‘Lovely Lili’ challenge over at The Ribbon Girl blog and our challenge is a lovely one indeed because it's all about saying

Thank You

It’s always nice to say thank you I think – if only some people in our village would remember this when you let them through even if it is your right of way - (ooh it is one of my pet hates!!).


We have 2 fab prizes for you -

A LOTV stamp of your choice

and a £10 voucher towards a spending spree at The Ribbon Girl


I think you may be surprised at my card today because it was one I did when I fiddling with the shabby chic /vintage thing a few weeks ago  and here …

... it is.
And not an image in sight!!! .

One of the designers whose cards I just adore is Klaudia and my card here was inspired by a card that she did.
So I must say thank you to her first  for the inspiration I have gotten from looking at her beautiful work xxx

The papers I used are the gorgeous Lili of The Valley Antebellum and I inked and distressed them to within an inch of their lives.
They can take it lol!!

The sentiment is from the LOTV Set 58 - Pretty Grungy - Good Times set.
I stamped it straight onto the paper and then punched it out.
It looks like it is at a very dodgy angle in this pic but it isn't IRL – it’s just how it looked from the angle I took the pic!!


I used a mixture of home made paper flowers which I made using Tim Holtz Tattered Florals and others which I got from Mary at The Ribbon Girl.

The flowers from Mary are -

 Tiny Pink Rosebuds, White Starburst Stamen, Pink / Pale Pink Beaded Berries, White Beaded Twirl, 10mm Pink Open Rose, White Floribunda Rose, Floribunda Roses Raspberry Ripple, Darjeeling White Blossom Flower, White Kort & Godt Chrysanth, Rolled Paper Flowers - Ivory Roses Kort & Godt.

I also used  White Seam Binding which I dyed using a Cosmic Shimmer spray.
I spritzed it with the spray then scrunched it up and left it to dry and it dried all lovely and crinkly.

I also used 12mm White Cotton Lace and White Tulle.

The leaves are Tim Holtz Bigz Garden Greens and I die cut them from white card then used some Distress inks and Cosmic Shimmer spray on them so that they looked a bit variegated.

I was quite pleased with how this turned out and it’s given me the confidence to try another card like this s0 watch this space!!
I think I can see an improvement from my last attempt which I’m happy about.

Right I'm off to do some more colouring  - I can’t say what of just yet but it is seasonal, ho ho ho (hee hee heeee).
Then I have to finish, nay start, the grey wicker heart wall hanging thingie which I bought months ago for our bedroom wall.
It needs a bit of tarting up with some floral what nots and ribbon or lace then it can be hung up.

Dicky Mint is at work today and I did my housework (yawwwwwn) yesterday so that  I can have a whole day to craft. Well, that's the plan but Sod’s law that it won’t pan out like that – it never does : 0)

Have a great day whatever you are doing and huggiest of hugs to all xxx