Pages

Thursday, 29 October 2020

A Fruity Number :)


Hello loves - hope your are well today.


I'm sharing a couple of projects I made using this months Tonic Studios Designer Choice and it's the ever so sweet 

Back To School Drinks Carton.


This is what you get - look at the cute fruits. I love them :)

I've put together a detailed step by step tutorial with loads of pics to show you how to put this together - it's really easy - and you can see it here

I'll also show you how you can make this taller or shorter. 

And I also used this set to make .... 


... a really nice beach hut framed picture and you can see that video here. 


Sometimes it's nice to do something different with your dies so for this..... 


... I did a bit of stencilling. 


I like the pattern this has made. 


And I love the little strawberry.


So that's my project for today and if you'd like to buy any of the stuff I've used, please check out my affiliate links below. It won't cost you any extra but I will earn a small commission (thank you xx)


Before I go, I must tell you about this bad boy - released today. 

It's the long awaited Tim Holtz Deckle Edge Trimmer and it's fabulous. Well, Tim doesn't do rubbish does he. It takes the work out of making distressed deckled edges on your mats, cards and projects. 

Links are below.


Wednesday, 28 October 2020

Rustic Rose - Soooo Pretty


Hello me darlings.

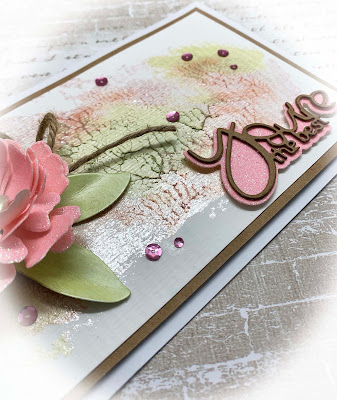
Ooh I do like the colours in this card. I made it using the last colour trend of the year from Tonic Studios and this one is Rustic Rose. 

Well it has pink in it so it was always going to be a winner for me lol!!

There's a collection of card, papers (they're fab),  Nuvo Drops, pastes, mousses, inks, you name it. 
And they all coordinate beautifully ....


... see what I mean?


 I made the card using some of the elements from the trend and even used the mousse to colour the leaves. 

So it all matches, which you know I like 😃


I cut several of the sentiments from kraft card and layered them up so it looked nice and chunky.

And I made the pretty background using Nuvo Drops and Glimmer Pastes from the colour trend - look at that sheen. And if you haven't seen how to do this easy peasy technique, please have a look at my YouTube video here 


The flower is made using the Perfect Petunia Die set and I added a blob of Enchanted Elixir Dream Drops in the middle. Then I went and stuck my finger in it before it had dried and made a right mess!! 

So I just added a bit more. 
It looks a bit like a pearl bead - I love it so it was a happy accident I suppose!!


A bit of bling - you can't beat it :)


And that's the finished card - really easy but I was pleased with how it turned out.


I made up some more sample using the colour trend and I've done a step by step tutorial for ....


... this card here which uses the bargello technique ( a proper stash buster!!). 

You can find it here

And for more ways to use these gorgeous products, please check out my YouTube video - I'll talk you through the bargello card and also show you a few others that I made using the same stuff. You'll find that here.


Thank you for stopping by today and hope you like what I've shared. 

If there's anything you'd like me to share or make up,  please do let me know by leaving me a comment and I'll do my best to sort it for you.

Please stay safe and stay well xx


Here's my affiliate links for both the UK and Europe and also the USA


UK and Europe


USA

Craft Perfect - Rustic Rose - Full Card & Paper Bundle - 404B


Tuesday, 27 October 2020

Pretty in Pink!!


Hello crafty friends. 

Today I'm sharing an easel card I made using the Tonic Studios Rose Trellis Layering Frame Die Set. I really liked how this turned out and those frame dies can be used for a multitude of sins :)

You basically fold a piece of card  in half and then overhang the die a little bit over the fold. Cut it out and then cut another one in the usual way ie single thickness card. Bend one side of the double thickness piece to the middle and then glue the single thickness piece on top. 

Super easy but I think they make cards that look like you've gone the extra mile lol.


This is the set and I used various dies in the set to layer up. 
It's a Nuvo set so a double whammy for usage.

Now the sentiment stamp I used, as well as the little leaf border, was made using this ....


.. set of stamps here and I absolutely love this set.  
It's amazing value at £14.99 or $15.99 if you're over the water for 26 stamps and there's something there for all occasions. 

And it stamps beautifully. 


I added a few Party Pink Nuvo Drops to the top layer, just to break up the white and finished off with some rolled roses and a pretty pink bow. 

I hope you like it - it's one of my faves I think.

Have a lovely day and above all, stay safe and stay well. 
These are mad times aren't they xxx


I've added my affiliate links below for both the UK/Europe and also the USA. 

It won't cost you a single penny or dime if you click and buy but I do earn a small commission (thank you xx).


UK/ Europe

Tonic Studios - Rose Trellis Layering Frame Die Set - 3487E


USA


Monday, 26 October 2020

Sweet Little Satchel - Sooooo Cute


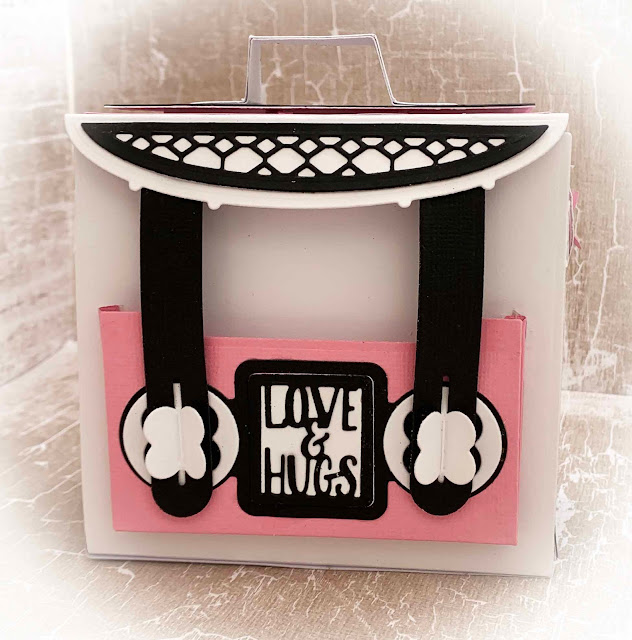
Hello crafty loves and I'm back to share a sweet little satchel memory / photo holder which I made a while ago. It's a lot easier to put together than you think and it's perfect for holding photos etc. 
 
I've done a detailed step by step tutorial with full colour photos over on the Tonic Blog if you fancy having a go. 

Even if you are a newbie crafter, this is a project you can easily do - just follow the step by steps :)


Inside, there are little individuals pockets for up to store your bits and bobs and you could also use these for other projects as well because they're really handy.


If you made this in Christmas colours, it would make a lovely little gift I think and it would be loved by young and old alike, as well as those awkward teenagers (yes we have one now because our Kyla is nearly 15 -  where did that time go???). 


The handle is quite sturdy and the opening and closing mechanism is just that little pink butterfly you can barely see here - you can see it better in the top pic. So simple but very effective.

Because it's a Nuvo set, you get all your outside  and inside edge dies which gives you plenty of scope for decorating. 


So that's the satchel and I hope you like it. 
There are loads of other ideas for using this set over on Pinterest, Instagram etc. 

I've listed the stuff I used below- clicking on the links in bold will take you to the relevant place on the website. If you decide to buy, it won't cost you a penny / dime but I will receive a small commission (thank you  xx). 


Have a great day and if you make any of these, please post a pic in the comments below. I'd love to see your makes. 

Have a great day and stay safe and well  xx


Links for the UK and Europe - 

Tonic Studios - Memory Book Satchel Bag Die Set - 3525E -  
https://shrsl.com/2ktch


Craft Perfect - Classic Card - Blossom Pink - Weave Textured - A4(10/PK) - 9066e 

https://shrsl.com/2ktbp


Craft Perfect - Classic Card - Jet Black - Weave Textured - A4(10/PK) - 9011e - 

https://shrsl.com/2ktbt


Craft Perfect - Classic Card - Bright White - Weave Textured - A4(10/PK) - 9016e 

https://shrsl.com/2ktcl


Nuvo - Adhesives - Deluxe Adhesive - 200n

https://shrsl.com/2ktcw


Links for the USA - 

Tonic Studios - Memory Book Satchel Bag Die Set - 3525E  - 

https://shrsl.com/2kta4


Craft Perfect - Classic Card - Blossom Pink - Weave Textured - A4(10/PK) - 9066e - 

https://shrsl.com/2ktbp


Craft Perfect - Classic Card Weave Textured - Jet Black - 8.5"x11" (10/PK) - 9611e -

 https://shrsl.com/2ktbw


Craft Perfect - Weave Textured Classic Card - Bright White - 8.5"x11" (10/PK) - 9616e - 

https://shrsl.com/2ktc6


Nuvo - Adhesives - Deluxe Adhesive - 200n

https://shrsl.com/2ktcr


Friday, 23 October 2020

Well it's been a while I must admit. 

In fact I feel quite bad for ignoring my poor old blog, and a lot has happened since my last post, including getting a new pair of eyes. 

Yayy I can see again!!

Anyway I put myself on the naughty step and promise I will TRY and do better for now on. I just want to thank everybody who has kept popping over - I appreciate each and every one of you xxx and at least now there's something new to see. 

So to kick things off, I've made a really quick and very easy card using some Tonic Studios Glacier Pastes and gorgeous  card which are included in a brand new weekend saver deal so there's bargains to be had here. I'll post my links to everything I used, as I always did, but these are now affiliate links. It won't cost you anything extra if you decide to buy but I will earn a small commission (thank you xx)


So this is my card.

The star is made using a star layering die but this will work using any to be honest.  
And I used these ......


If you've never used them before, ooooh you are missing a trick. You can make backgrounds, paint with them, use them with stencil, on fabric . The list is endless. 

I did a couple of  YouTube videos which you can see here and here showing how I used them to make backgrounds and also some ideas for different cards.


Basically you just slosh (technical lol) them onto your card, take another piece of card and then squish them together. It's a bit like making those ink blot picture things. It's super easy and there's no psychiatrist to tell you things you didn't want to know!!!

While the paste was wet, I sprinkled some  gold glitter over it (some things have not changed!!!) and you can see the sheen from the paste and the sparkle from the glitter in this pic.

The little sentiment is from the Tonic Studios Staggered Stage die set. 
It's very cute and also very handy if you have a relative called Noel  😂 


I just basically matted and layered a mix of cards including some Pearl White  and Crimson Silk cardstock (both in the weekend saver btw)  and stuck the star and sentiment on. The sentiment is matted into a scrap of Crimson Silk card - such a beautiful texture to this.


So that's it for today. 
Thank you so much for stopping by. Do stay tuned because I have some blog candy and giveaways coming up, just to say thank you for keeping the faith!!

Loads of love and hugs xxx